Impossible Objects has made a groundbreaking announcement, revealing their revolutionary CBAM 25 3D printer, capable of printing fifteen times faster than the closest competitor. Set to be unveiled at the RAPID + TCT tradeshow in Chicago next month, this innovative 3D printer will have a significant impact on the world of mass production and industrial applications.
Impossible objects CBAM Slice
The CBAM 25 will become commercially available in early 2024, promising to bring 3D printing into the realm of volume manufacturing. By breaking the speed barrier, the CBAM 25 will deliver advanced materials with superior mechanical properties and tolerances, providing manufacturers with an unprecedented advantage over existing technologies.
Robert Swartz, Founder and Chairman of the Board at Impossible Objects, stated, “The CBAM 25 is the world’s fastest printer, and we are entering a new era of 3D printing with nearly unlimited material options at the speed of true mass production. This is a Moore’s law moment for 3D printing, and this is just the first step.”
The CBAM 25 utilizes high-performance composite materials, enabling engineers to design stronger, lighter, and more durable parts. Notably, the Carbon Fiber PEEK material set offers high chemical and temperature resistance and mechanical properties superior to most engineering plastics. Carbon Fiber PEEK parts are a suitable alternative for aluminum, tooling, spares, repairs, and end-use parts.
Impossible objects CBAM Layer
Impossible Objects is currently producing and selling parts in untapped 3D markets such as electronic tooling and for a broad range of applications, including aerospace, defense, and transportation industries. It is also replacing CNC machining with greater geometric freedom.
Steve Hoover, Impossible Objects’ CEO, emphasizes the importance of production speed with the new CBAM 25, stating, “With a fifteen times speed improvement over existing 3D printers, our new CBAM 25 completes the transition of 3D printing from its roots in prototyping to the heartland of manufacturing.”
Impossible objects CBAM Machine
The CBAM 25 is indeed a giant leap forward, pushing 3D printing into volume manufacturing, and opening new opportunities for industries to reshape and rethink their manufacturing processes.
The launch of the CBAM 25 marks a turning point for 3D printing, demonstrating the potential for exponential advancements in speed, material capabilities, and applications. For readers interested in learning more about this revolutionary technology, we recommend attending the RAPID + TCT tradeshow in Chicago, where the CBAM 25 will be unveiled. Additionally, stay informed on the latest developments in the 3D printing industry by following Impossible Objects and other leading companies.
By embracing the CBAM 25 and its potential, businesses can optimize their manufacturing processes, reduce costs, and create innovative products that push the boundaries of what’s possible in the world of 3D printing.
Electron beam powder bed fusion is a metal additive manufacturing process in which an electron beam selectively melts regions of a powder bed under vacuum. The current standardized designation is PBF-EB/M: powder bed fusion using an electron beam for metallic materials.
“Electron Beam Melting” or EBM is a familiar commercial and historical term. PBF-EB/M is the clearer process-category name and distinguishes powder-bed systems from wire-fed electron-beam directed energy deposition.
How PBF-EB/M works
Build preparation: The released part geometry is oriented, supported, nested and converted into a machine-specific build strategy.
Vacuum generation: The chamber is evacuated so the electron beam can travel with limited scattering and reactive alloys can be processed with reduced atmospheric exposure.
Powder spreading: A controlled powder layer is deposited across the build area.
Preheating: A defocused, rapidly scanned beam heats and partially consolidates the powder bed. This helps control charging, powder movement and thermal gradients.
Selective melting: A focused electron beam melts the cross-section of the part according to the build file.
Layer repetition: The platform is lowered, new powder is spread and the cycle repeats.
Cooling and recovery: After the build, the hot powder cake and components cool before powder recovery and part removal.
Post-processing: Supports, machining stock and surface condition are addressed through the qualified downstream route.
Why vacuum and preheating matter
The electron beam is generated and steered electromagnetically. A vacuum environment reduces collisions between electrons and gas molecules and limits oxidation of reactive alloys. Unlike many laser powder-bed systems, PBF-EB/M generally operates with a substantially elevated powder-bed temperature.
Preheating can reduce residual stress and distortion, but it also changes powder handling. The surrounding powder may become a lightly sintered cake that supports the part and must later be broken down and recovered. The preheat strategy is also critical for avoiding electrostatic powder movement, often described as powder “smoking.”
PBF-EB/M vs laser powder bed fusion
Characteristic
PBF-EB/M
PBF-LB/M
Energy source
Electron beam
Laser beam
Atmosphere
Vacuum, sometimes with controlled gas addition depending on platform
Typically inert gas
Powder-bed temperature
Generally high due to preheating
Platform and alloy dependent; commonly lower than PBF-EB
Beam steering
Electromagnetic and very fast, without mechanical scanning mirrors
Optical scanner and galvanometer system
Residual stress
Often lower because the build remains hot
Can be higher, requiring strong support and stress-control strategies
Surface and feature resolution
Typically rougher and less suited to the finest features
Often finer detail and smoother as-built surfaces
Powder recovery
Removal from a partially sintered cake can be intensive
Loose-powder recovery is generally more direct
Material range
Historically strongest in selected conductive alloys, especially titanium
Broader commercial alloy and machine ecosystem
Support function
Supports mainly provide thermal anchoring, stability and location; the powder cake provides mechanical support
Supports commonly provide thermal conduction, anchoring and mechanical stability
Neither process is universally superior. The choice depends on alloy, geometry, resolution, thermal behavior, production volume, qualification and downstream operations.
Materials
PBF-EB/M requires electrically conductive feedstock and a stable relationship between powder, preheat and melt strategy. Commercial maturity has historically been strongest for titanium alloys and cobalt-chromium, with platform-specific routes for nickel alloys and expanding research or industrialization in refractory materials.
Ti-6Al-4V and Ti-6Al-4V ELI: aerospace structures and orthopedic implants
Cobalt-chromium alloys: medical and dental applications where the qualified route supports them
Nickel alloys: selected high-temperature applications, with capability dependent on machine and parameter maturity
Pure metals and refractory materials: active development areas including tungsten for energy and defense applications
A published alloy name does not establish production capability. Feedstock specification, machine platform, parameter set, post-processing and inspection must be qualified as one route.
Design considerations
ISO/ASTM 52911-3 provides process-specific design guidance for PBF-EB of metallic materials. Practical design reviews should address:
Feature resolution: do not transfer PBF-LB minimum-feature assumptions directly to PBF-EB.
Down-facing surfaces: expect roughness, attached particles and geometry-dependent limits.
Supports and anchors: design for thermal transfer, positional stability and removal.
Powder removal: provide access for breaking and extracting the sintered powder cake from channels and cavities.
Machining stock: add material to datums, bores, sealing surfaces and fatigue-critical regions.
Nesting: stacked production can improve build utilization but complicates recovery, traceability and thermal interaction.
Inspection access: complex internal features must remain inspectable or supported by validated process evidence.
Microstructure and properties
The elevated build temperature and directional thermal history can create process-specific texture, grain morphology and phase condition. Properties depend on build orientation, location, section thickness, chemistry, heat treatment, HIP and surface condition.
Low residual stress does not mean zero distortion or automatic fatigue performance. As-built roughness, near-surface imperfections and internal defects can still control life. Material data should match the exact production route and part condition.
Typical imperfections and process risks
Risk
Possible contributors
Control approach
Lack of fusion
Insufficient energy, poor overlap, contaminated or uneven powder
Qualified parameters, powder control, monitoring and volumetric inspection
Gas or process porosity
Feedstock condition, melt instability or entrapped gas
Feedstock specification, process stability and validated thermal route
Powder smoking
Electrostatic charging and inadequate preheat/consolidation
Platform-specific preheat strategy and powder qualification
Surface-connected irregularities
Downskin, attached particles, supports and powder interaction
Orientation, design allowance, machining and surface finishing
Dimensional error
Thermal distortion, beam calibration, compensation and recovery damage
Machine control, calibrated compensation and dimensional inspection
Contamination or chemistry drift
Powder reuse, handling, chamber condition and exposure
Material genealogy, testing, reuse rules and housekeeping
ISO/ASTM 52948:2026 provides a common classification of imperfections that can occur in both laser- and electron-beam metal powder bed fusion. It does not define universal acceptance limits; those remain application and engineering-authority decisions.
Post-processing
Powder-cake removal and controlled powder recovery
Part separation and support removal
Heat treatment or HIP where required by the route
Machining of datums, interfaces and critical surfaces
Surface finishing and cleaning
Dimensional, NDT, material and functional verification
The high build temperature can reduce the need for a separate stress-relief step in some qualified routes, but post-processing requirements must be established from material and application evidence rather than assumed.
Applications
Orthopedic implants
PBF-EB/M has a long industrial history in titanium orthopedic components. The process can produce porous or lattice regions for bone ingrowth alongside dense structural regions, subject to validated cleaning, fatigue, biocompatibility and regulatory controls.
Aerospace
The process is attractive for titanium components that benefit from reduced residual stress, stacked production or complex geometry. Aerospace use requires strict machine, material, operator, post-processing and inspection qualification.
Energy, defense and refractory materials
Open and industrial PBF-EB platforms are being developed for materials such as tungsten and other difficult-to-process metals. These applications are promising but should be described by demonstrated route maturity rather than broad claims about the process category.
Economics and production planning
PBF-EB/M economics are influenced by much more than beam speed:
Vacuum and preheat cycle time
Build height and nesting density
Cooling and powder-cake recovery
Powder refresh, testing and reuse
Support removal and machining
Inspection and accepted-part yield
Machine availability, cathode life and maintenance
Fast electromagnetic beam movement can support high productivity, but cycle economics must include the complete hot-build and recovery route.
When PBF-EB/M is a strong candidate
The alloy and application already have a mature PBF-EB route.
Elevated build temperature provides a meaningful residual-stress or cracking advantage.
The geometry tolerates the process’s feature-resolution and surface limitations.
Stacked production or efficient beam scanning improves accepted-part economics.
Vacuum processing benefits a reactive material.
Powder recovery, machining and inspection are available.
PBF-EB/M is not wire-fed EBAM
PBF-EB/M spreads powder across a bed and selectively melts each layer. Wire-fed electron-beam AM feeds wire directly into a melt pool and belongs to directed energy deposition, usually DED-EB/M. The latter has much higher deposition rates and supports large near-net preforms, but provides lower geometric resolution and requires substantial machining.
Conclusion
Electron beam powder bed fusion is a distinct industrial process with a hot powder bed, vacuum environment and fast electromagnetic beam control. Its value is strongest where material, geometry and qualification align with those characteristics. Process selection should compare the complete route—including recovery, machining, inspection and accepted-part yield—rather than relying on generic claims about speed or material utilization.
Wire arc additive manufacturing (WAAM) uses metal wire as feedstock and an electric arc as the heat source to deposit material layer by layer. In current standards-oriented terminology, it sits within directed energy deposition using wire and arc, often written as DED-Arc/M.
WAAM is best understood as a high-deposition-rate near-net-shape process. Its value comes from reducing material waste and lead time for large parts — not from producing finished geometry directly from the torch.
How WAAM works
A welding power source, wire feeder and torch are integrated with a robot, gantry or multi-axis motion platform. The arc melts the incoming wire and a local region of the substrate or previous layer. Toolpaths build the component bead by bead and layer by layer. Common arc variants include gas metal arc, gas tungsten arc and plasma arc processes.
Cold Metal Transfer (CMT) is a controlled gas-metal-arc process developed by Fronius and widely associated with lower heat input and controlled droplet transfer. It is one implementation route, not a synonym for WAAM.
WAAM component originally credited to Fronius
Where WAAM fits best
Large titanium, aluminum, steel or nickel-alloy near-net-shape components
Low-to-medium production volumes where tooling cost is difficult to justify
High buy-to-fly components traditionally machined from large billets or forgings
Repair, remanufacture and addition of features to existing components
Preforms that will receive substantial finish machining
Applications where wire is safer, easier or more economical to handle than fine metal powder
WAAM is usually a poor fit for very small features, tight as-built tolerances, fine internal channels or surfaces that cannot be machined.
The real advantages
High deposition rate
Wire-and-arc systems can deposit material much faster than most powder-bed processes. The practical rate depends on alloy, arc mode, geometry, heat input, interpass strategy and quality requirements. A higher deposition rate only creates value when downstream machining and inspection remain manageable.
High feedstock utilization
Wire delivery places most feedstock into the melt pool and avoids the powder handling, sieving and recovery systems required by powder-bed routes. This is particularly attractive for expensive alloys, although start/stop waste, machining stock and rejected builds still affect total material yield.
Large build envelope
The motion platform rather than a sealed powder bed often defines the envelope. Robots and gantries can produce structures far larger than conventional LPBF systems, provided shielding, path planning and thermal control are maintained.
Repair and hybrid manufacturing
WAAM can add material to forgings, plates or existing components. Hybrid routes can combine a conventionally manufactured substrate with additively deposited features, followed by machining. This often creates a stronger business case than printing the complete part.
The limitations that determine success
Constraint
Why it matters
Typical mitigation
Heat input and accumulation
Changes bead shape, microstructure, distortion and interpass stability
Interpass temperature control, dwell time, active cooling, path planning and process monitoring
Residual stress and distortion
Large thermal cycles can move the part during and after deposition
Balanced paths, fixturing, rolling, heat treatment, simulation and machining allowance
Surface roughness and waviness
As-deposited beads are not final engineering surfaces
Near-net-shape design followed by machining or finishing
Dimensional accuracy
Bead geometry varies with torch angle, wire position, travel speed and heat state
Closed-loop sensing, calibrated tool-center point, adaptive paths and probing
Anisotropy and microstructure
Layered thermal history can produce directional properties and local variation
Qualified parameters, interpass control, heat treatment and representative testing
Defects
Lack of fusion, porosity, inclusions, oxidation and cracking can occur
Stable transfer, shielding, cleaning, parameter control, monitoring and NDT
Access and collision risk
Torch, robot, fixture and growing part can interfere
Multi-axis simulation, staged deposition and integrated machining planning
Material considerations
Commercial and research WAAM routes cover low-alloy and stainless steels, aluminum alloys, titanium alloys and nickel-based alloys. Printability is alloy-specific. Wire quality, surface cleanliness, cast and helix, chemistry, shielding gas and storage conditions all influence stability.
Reactive alloys such as titanium require strict shielding beyond the immediate arc region. Aluminum demands attention to oxide control, wire feeding and heat accumulation. Nickel alloys may face hot cracking, segregation or heat-treatment challenges. A weldable alloy is not automatically qualified for an additively manufactured structural application.
Design rules for WAAM
Design near-net shape: include machining stock on critical surfaces and interfaces.
Use accessible geometry: the torch, shielding arrangement and cutting tool need clear approach paths.
Avoid abrupt mass changes: they destabilize heat flow and bead geometry.
Plan starts, stops and intersections: these locations can concentrate defects and geometric variation.
Control slender features: tall walls and thin sections can distort or vibrate.
Use modular deposition: dividing a complex part into stable zones can improve access and thermal control.
Define datums and fixtures early: the part must remain locatable after deposition and heat treatment.
A realistic WAAM production workflow
Define the final part requirements and choose the substrate or preform strategy.
Select alloy, wire specification, arc process, shielding and motion platform.
Develop bead geometry and layer-height control on representative coupons.
Create a deposition model with machining allowance, tool access and inspection zones.
Simulate toolpaths, robot reach, collision risk and thermal distortion where appropriate.
Qualify the procedure, equipment, operator responsibilities and monitoring plan.
Deposit with controlled interpass temperature and traceable process data.
Apply stress relief or other heat treatment as required.
Machine the component to final dimensions.
Inspect material, geometry and critical defect modes against defined acceptance criteria.
Process monitoring and closed-loop control
Useful sensing can include arc voltage and current, wire-feed speed, travel speed, interpass temperature, melt-pool or bead imaging, laser profiling, acoustic signals and in-process probing. Monitoring is valuable only when signals are linked to known failure modes and response limits.
Closed-loop systems may adjust travel speed, wire feed, torch position or layer height. They reduce variation but do not remove the need for qualified procedures, calibration, material control and final inspection.
WAAM economics: calculate the complete route
A credible cost model includes wire, substrate, deposition time, shielding gas, labor, fixtures, heat treatment, machining, tooling, inspection, scrap risk and machine utilization. Compare the WAAM route with the actual alternative — billet machining, forging, casting, fabrication or repair — using total lead time and accepted-part yield.
WAAM tends to be strongest where conventional material removal is high, lead times are long, geometry is large and the final machining envelope remains practical.
Standards and qualification
ISO/ASTM 52943-2:2024 establishes aerospace process-characteristic and performance requirements for directed energy deposition using wire and arc. ISO/ASTM 52926-5:2023 addresses operator qualification for DED-Arc/M. These standards reflect the transition of WAAM from laboratory demonstrations toward controlled industrial production.
Conclusion
WAAM is a powerful route for large near-net-shape metal components, repair and hybrid manufacturing. Its success depends on welding metallurgy, thermal management, robot accuracy, path planning, machining and inspection working as one system. The right question is not how quickly material can be deposited, but how reliably the route produces an accepted finished component.
When it comes to advanced manufacturing, additive manufacturing, or 3D printing, has been hailed as a game-changer, capable of revolutionizing various industries. This innovative technology has the potential to unleash an array of new possibilities, from creating complex hollow structures to optimizing part designs for enhanced performance. However, despite its promise, 3D printing has yet to reach its full potential, primarily due to the limitations in materials, cost, and scalability. In this blog post, we will delve into the challenges holding 3D printing back and explore the advancements required to overcome these obstacles.
The Power of Additive Manufacturing:
3D printing has opened doors to designs that were once deemed impossible, thanks to its ability to create intricate hollow structures. Designers can now integrate cooling channels directly into high-temperature parts such as turbine blades and rocket nozzles. Additionally, topology optimization allows for the generation of the perfect structure for any application, much like our hollow bones, enabling lightweight vehicles to gain even more performance.
Furthermore, traditional manufacturing methods often involve machining parts from large blocks of raw materials, resulting in significant waste. In the aviation industry, this waste is measured by the buy-to-fly ratio, which compares the weight of the final part to the weight of the raw material it was manufactured from. With 3D printing, this waste can be significantly reduced, leading to decreased costs and a more sustainable manufacturing process.
A prime example of the capabilities of 3D printing is the incredible aerospike rocket engine, which incorporates liquid cooling channels directly into the rocket nozzle’s interior. This optimized design results in a highly efficient rocket nozzle that can operate effectively at various altitudes.
Additive Rocket Engine – NASA
Challenges and Limitations
Despite the numerous benefits and potential applications of 3D printing, several factors are holding it back from widespread adoption. One major issue is the cost. When plotting the price of a 3D printed part as a function of the number of parts created, it becomes apparent that the initial machine cost dominates the price, and scaling up requires the purchase of additional machines. This lack of economies of scale makes 3D printing less attractive for high-volume, low-cost applications.
Another challenge lies in the material properties of 3D printed parts. With thousands of years of experience in traditional metal forging, we have developed a deep understanding of how manufacturing techniques affect a metal’s properties. However, additive manufacturing forces us to start from scratch, building up our knowledge of the material properties of 3D printed parts.
A key area of research in this regard is improving the fatigue life of 3D printed metals. Fatigue life refers to the number of stress cycles a part can withstand before breaking. Compared to traditionally machined parts, 3D printed parts tend to have a shorter fatigue life, making them less suitable for critical applications such as aviation.
3D Printed Turbine Blades with Cooling Channels – ORNL
Research and Advancements in Additive Manufacturing Materials
Alloy Development for Additive Manufacturing
Researchers are working on developing new metal alloys specifically designed for additive manufacturing. These alloys aim to provide better material properties, such as improved strength, ductility, and fatigue life, compared to existing materials used in 3D printing. Companies like OXMET are focusing on creating novel metal alloys that are optimized for additive manufacturing, taking into account the unique challenges and opportunities of the technology.
Researchers at HRL Laboratories have developed a new metal alloy specifically designed for 3D printing: a high-strength aluminum alloy called Al 6061. This material offers improved performance and reduced cracking compared to conventional aluminum alloys. Its successful development and implementation have opened up new possibilities for 3D printed aerospace, automotive, and structural components.
GRCOP-84 Powder Development – NASA Glenn Research Center
Post-processing Techniques
Post-processing techniques, such as hot isostatic pressing, can help improve the fatigue life of 3D printed parts. These methods involve applying heat and pressure to the printed part, closing the pores and imperfections that can lead to crack growth and fatigue failure. Researchers are also exploring other post-processing methods, such as heat treatments, that could further enhance the material properties of 3D printed metals.
Tailoring Laser Scan Strategies
By adjusting the laser scan strategy during the 3D printing process, researchers have discovered that they can influence the internal grain structure of the printed metal. This, in turn, affects the material’s properties, such as strength and fatigue life. Different scan strategies, such as the island or helical patterns, are being investigated to optimize the material properties of 3D printed metals.
One notable example of this research is a project undertaken by the Oak Ridge National Laboratory, where scientists are investigating how adjusting the laser’s speed and power can impact the material properties of 3D printed metals. Their findings could lead to the development of new techniques that improve the fatigue life of printed parts, making them suitable for more demanding applications such as aviation.
Machine Learning and In-situ Monitoring
Researchers are also exploring the use of machine learning and in-situ monitoring to optimize the 3D printing process. By using thermal cameras and other specialized sensors inside the build chamber, they can observe phenomena like pore formation and adjust the laser’s operation in real-time to maximize material properties. This approach has the potential to significantly improve the fatigue life and overall performance of 3D printed parts.
Researchers at the Technical University of Munich have developed a method called “in-situ process monitoring” that uses high-speed cameras to observe and analyze the 3D printing process in real-time. This method helps identify and minimize imperfections, such as porosity or cracks, and optimize the internal crystal grain structures for improved material properties.
Siemens has been working on a project that combines machine learning and 3D printing to optimize the laser scan strategies for additive manufacturing. By analyzing the data generated during the 3D printing process, the company’s machine learning algorithms can determine the optimal scan patterns and laser settings, resulting in parts with improved material properties and reduced defects.
Multi-Material Printing and Hybrid Manufacturing
The future of additive manufacturing will likely involve the ability to print with multiple materials simultaneously, opening up new possibilities for creating complex, multi-functional parts. Hybrid manufacturing, which combines additive manufacturing with traditional subtractive methods like CNC machining, is also an exciting development on the horizon. This approach offers the best of both worlds, enabling the creation of intricate, optimized designs through 3D printing while ensuring the final parts meet the highest standards of precision and surface finish.
Conclusion
While 3D printing may not be suitable for low-cost, high-volume parts, improving fatigue life and material properties could lead to its use in more specialized applications, such as aerospace and other high-performance industries. As research continues to optimize 3D printing techniques and materials, we can expect to see additive manufacturing play an increasingly important role in the future of manufacturing.
The ongoing advancements in cost reduction and material property optimization are creating exciting opportunities for 3D printing. As the technology matures, we may soon see a shift from its current focus on prototyping to a more widespread use in various industries. From automotive to aerospace, 3D printing has the potential to revolutionize how we design and manufacture products. With continued research and innovation, the future of 3D printing looks incredibly promising, and it will undoubtedly continue to shape the manufacturing landscape for years to come.
This older article has been merged into Addithive’s updated pillar guide to avoid duplicate and conflicting explanations. The new guide covers the seven additive manufacturing process categories, the difference between 3D printing and industrial AM, a practical beginner workflow, material and process selection, applications, limitations and sustainability.
Nondestructive testing (NDT) is essential for additive manufacturing, but no single method can guarantee that a complex AM part is defect-free. Inspection capability depends on the process, alloy, geometry, surface condition, defect type, defect orientation, required resolution and acceptance criteria.
The correct question is not “Which NDT method is best for AM?” It is “Which combination of methods can detect the credible defects in this specific part with the required probability of detection?”
Why AM inspection is different
Metal additive manufacturing can produce internal channels, lattices, thin walls and highly integrated geometries that are difficult to inspect using methods developed for simple wrought or machined parts. AM defects can also be small, irregular, directionally oriented and distributed differently across the build.
Inspection planning therefore begins with the complete manufacturing route: feedstock, machine, process parameters, build orientation, heat treatment, hot isostatic pressing, machining and surface finishing. Post-processing can close, reveal, reshape or remove indications, so the inspection stage matters.
Common defect and imperfection classes
Imperfection
Typical cause
Inspection challenge
Lack of fusion
Insufficient energy, poor overlap, contamination or unstable powder layer
Often planar and orientation-sensitive
Gas porosity
Entrapped gas, powder condition or melt-pool behavior
Small rounded pores may require high volumetric resolution
Keyhole porosity
Excessive energy density and unstable deep melt pool
May appear as irregular or elongated pores
Cracks
Residual stress, hot cracking, thermal cycling or alloy sensitivity
Thin planar cracks can be difficult to detect when poorly oriented to the inspection beam
Inclusions or contamination
Foreign material, oxide, spatter or handling contamination
Detectability depends on density contrast and size
Dimensional deviation
Shrinkage, distortion, support failure, thermal behavior or post-processing
Internal geometry may be inaccessible to conventional metrology
Surface-connected discontinuities
Support removal, machining damage, cracking or incomplete fusion
Rough as-built surfaces can create false or masked indications
Trapped powder
Insufficient escape paths or ineffective cleaning
May be hidden inside channels and cavities
X-ray computed tomography
Industrial X-ray computed tomography (CT) is one of the most powerful tools for AM because it can reconstruct internal and external geometry in three dimensions. It can detect porosity, lack-of-fusion regions, inclusions, dimensional deviations, trapped powder and inaccessible internal features.
CT is not unlimited. Detectability depends on voxel size, focal spot, detector, material density, wall thickness, part diameter, scan geometry, reconstruction and analysis settings. A large dense nickel-alloy part cannot be inspected at the same resolution as a small aluminum coupon. CT resolution claims must be connected to the actual part and minimum defect size.
Strengths: volumetric data, internal geometry, pore distribution and dimensional comparison.
Limitations: cost, scan time, penetration, artifacts, resolution versus part size and interpretation complexity.
Best practice: validate the technique using representative artifacts or seeded flaws and document the scan and analysis parameters.
Conventional radiography
Two-dimensional radiography can detect volumetric discontinuities and density variations, but it compresses three-dimensional information into a projection. Overlapping features and complex geometry can mask defects. Planar flaws aligned unfavorably to the beam may be difficult to see.
Radiographic testing
Ultrasonic testing
Ultrasonic testing can detect internal cracks, lack of fusion and other discontinuities in suitable geometries. Phased-array and advanced full-matrix techniques can improve coverage and imaging. However, rough surfaces, thin sections, complex curvature, internal channels and anisotropic microstructures can complicate coupling, wave propagation and signal interpretation.
Machined inspection surfaces or purpose-designed access may be needed. Calibration blocks and reference reflectors should represent the alloy, heat treatment, geometry and expected defect orientation as closely as practical.
Liquid penetrant testing
Liquid penetrant testing is effective for surface-breaking discontinuities on nonporous, clean surfaces. As-built AM roughness can retain penetrant and generate excessive background. The method is often more reliable after machining or surface finishing, when the inspection surface and cleaning process are controlled.
Penetrant testing cannot detect sealed internal defects and should not be treated as evidence of volumetric integrity.
Magnetic particle testing
Magnetic particle testing can reveal surface and near-surface discontinuities in ferromagnetic alloys. It is not applicable to titanium, aluminum, austenitic stainless steels or most nickel alloys. Surface roughness, geometry and residual magnetism must be controlled.
Eddy current testing
Eddy current methods detect surface and near-surface discontinuities in electrically conductive materials. They can be sensitive to small cracks, but probe access, lift-off, curvature, roughness, conductivity variation and geometry affect performance. Eddy current inspection is generally local rather than a complete volumetric method.
Optical and dimensional inspection
Coordinate measuring machines, structured-light scanners, laser scanners and optical microscopy verify dimensional and surface requirements. They do not replace volumetric NDT. Line-of-sight systems cannot measure hidden channels, and highly reflective or rough surfaces may require preparation or specialized scanning strategies.
In-situ monitoring is not final NDT
Melt-pool sensors, layer imaging, recoater monitoring, acoustic signals and machine logs can identify process anomalies. These data improve traceability and may support adaptive control. However, an anomaly signal is not automatically a verified defect, and the absence of an alarm does not prove that the part is acceptable.
In-situ monitoring must be correlated with destructive testing, NDT and production outcomes before it can support acceptance decisions. It is best viewed as one layer in a broader process-control and inspection strategy.
Probability of detection and validation
A method may detect a large laboratory defect without reliably detecting the smallest critical defect in production. For safety-critical applications, inspection capability should be demonstrated using representative part thickness, geometry, alloy, surface condition and defect type.
Define the minimum relevant defect size and orientation.
Use representative reference standards, test artifacts or intentionally seeded flaws.
Control equipment, calibration, software, analysis thresholds and operator qualification.
Document false-call risk and inspection blind zones.
Revalidate the method when geometry, material, surface or equipment changes materially.
How to build an AM inspection plan
Identify critical functions and credible failure modes.
Map likely imperfection types to the AM process and post-processing route.
Define inspection zones and required detection capability.
Select complementary surface, dimensional and volumetric methods.
Design inspection access into the part where possible.
Validate methods on representative artifacts or seeded flaws.
Set acceptance criteria based on engineering significance, not merely visibility.
Link results to build records, material genealogy and configuration control.
Quick method comparison
Method
Best at
Main limitation in AM
X-ray CT
Internal geometry and volumetric defects
Resolution, penetration, artifacts, cost and part-size trade-off
Radiography
Volumetric density changes in suitable geometries
Feature overlap and limited 3D localization
Ultrasonic testing
Internal cracks and planar defects with suitable access
Rough surfaces, complex geometry and anisotropic propagation
Liquid penetrant
Surface-breaking defects
As-built roughness and no subsurface capability
Magnetic particle
Surface/near-surface defects in ferromagnetic materials
Material limitation and surface sensitivity
Eddy current
Small surface/near-surface cracks in conductive materials
Local access, lift-off and geometry sensitivity
Optical/CMM
External dimensions and visible surface condition
No internal volumetric capability
In-situ monitoring
Process anomalies and traceability
Requires correlation; not direct proof of final part integrity
Conclusion
Reliable AM inspection combines process knowledge, complementary NDT methods and validated detection capability. Complex geometry does not make a part uninspectable by definition, but it can create blind zones that must be understood during design. The inspection plan should be developed with the part and manufacturing route, not added after printing.
Metal additive manufacturing can produce geometries that conventional processes cannot, but the as-built surface is rarely the final engineering surface. Roughness, partially fused particles, stair-stepping, support scars, down-facing irregularities and near-surface defects can affect fatigue, sealing, friction, flow, cleaning, coating and dimensional performance.
Surface finishing should not be treated as a cosmetic operation added after printing. It is part of the manufacturing route and should be planned during design.
Why AM surfaces are difficult
Surface condition depends on more than layer thickness. Process category, alloy, powder size, energy input, orientation, local heat flow, support strategy, recoating, scan parameters and post-build handling all contribute. The same part can contain several different surface states:
Up-facing surfaces: often smoother and more dimensionally stable than unsupported down-facing areas.
Down-facing surfaces: vulnerable to dross, partially fused powder and geometric sag.
Vertical walls: affected by layer stair-stepping, contour strategy and powder adhesion.
Support-contact regions: retain witness marks and local damage after removal.
Internal channels: may be inaccessible to conventional tools and difficult to inspect after finishing.
Machined stock surfaces: intentionally printed oversized so final geometry is created later.
Because surface requirements vary by function, a single roughness target for the complete part is usually inefficient. A better approach classifies surfaces by engineering need.
Start with functional surface requirements
Surface function
What matters
Typical finishing route
Structural fatigue surface
Notches, attached particles, near-surface defects and residual stress
Machining or controlled material removal, followed by polishing or peening where justified
Sealing face
Flatness, waviness, roughness and dimensional control
Machining, grinding, lapping or honing
Bearing or sliding interface
Geometry, roughness direction, hardness and wear
Machining, grinding, honing, superfinishing or coating
Fluid channel
Pressure loss, debris retention, cleanability and geometry preservation
Abrasive-flow, chemical/electrochemical or specialized internal finishing
Biological interface
Cleanliness, controlled texture and biocompatibility
Selective machining, blasting, chemical treatment and validated cleaning
Coating substrate
Adhesion, contamination, oxide state and target profile
Blasting, machining, cleaning or chemical preparation
Cosmetic surface
Visual uniformity and touch
Blasting, tumbling, polishing or coating
Mechanical finishing methods
Machining
CNC milling, turning, drilling, reaming, grinding and EDM remain the most reliable methods for creating tight tolerances and functional interfaces. Machining is commonly used for datums, bores, sealing faces, threads and mounting surfaces.
Designers should define machining stock, workholding, tool access and the datum strategy before printing. AM parts can contain residual stress, thin walls and interrupted surfaces that make machining less stable than a wrought blank. Heat treatment and build-plate removal sequence can materially change the final geometry.
Abrasive blasting
Bead, grit or shot blasting can remove loose particles and create a more uniform appearance. It is fast and scalable for accessible surfaces, but it does not create precision geometry. Media type, pressure, angle and contamination control must suit the alloy and final application.
Mass finishing and vibratory finishing
Tumbling and vibratory systems use media and relative motion to smooth exposed edges and surfaces. They work well for smaller robust parts, but can round sharp features, damage thin sections and provide uneven access to recessed geometry.
Abrasive-flow machining
Abrasive media is forced through a passage to remove high points and smooth internal channels. It can improve flow performance in manifolds and heat exchangers, but material removal is geometry-dependent. Process development should verify that critical wall thickness and channel shape remain within limits.
Peening and surface mechanical treatments
Shot peening, laser shock peening and related methods can modify near-surface residual stress and improve fatigue performance in suitable applications. Peening does not automatically remove surface-connected defects and should not be used as a substitute for required machining or inspection.
Chemical and electrochemical finishing
Chemical polishing
Chemical polishing removes material through a controlled reaction across exposed surfaces. It can reach complex areas without direct tool contact, but the rate depends on alloy chemistry, solution condition, temperature, flow and local geometry. Entrapped chemicals, selective attack and dimensional loss must be controlled.
Electropolishing
Electropolishing removes material electrochemically and preferentially smooths peaks. It is widely used for stainless steels and selected nickel, cobalt-chromium, titanium and other alloys with appropriate electrolytes. Electrical contact, current distribution, shielding and access determine uniformity. Deep blind passages may remain difficult.
Both chemical and electrochemical routes require validated cleaning and waste-control procedures. For medical, aerospace or fluid-service components, residual chemicals and altered surface chemistry can be as important as roughness.
Thermal and energy-based finishing
Laser polishing
Laser polishing locally remelts a thin surface layer so surface tension redistributes material. It can smooth selected accessible regions without abrasive media, but the thermal cycle can change microstructure, residual stress, oxide condition and dimensions. Line-of-sight access and parameter development are required.
Plasma and electrochemical plasma processes
Plasma-based finishing methods can reduce roughness on suitable conductive materials and complex shapes. Their effectiveness depends strongly on chemistry, current density, edge effects and process access. They are specialized processes rather than universal solutions.
Internal-channel finishing
Internal channels are one of AM’s strongest design advantages and one of its hardest post-processing problems. A channel can be printable but impossible to depowder, finish, clean or inspect. The finishing strategy should answer:
Can media or fluid reach every surface and exit completely?
Will bends, branches or changes in section create uneven removal?
Can the process preserve minimum wall thickness and calibrated flow area?
How will residual abrasive, chemical or powder be verified?
Can CT, flow testing or other methods confirm the finished geometry?
For critical channels, coupons and representative flow artifacts are usually more useful than generic roughness samples.
Surface finishing and fatigue
As-built metal AM surfaces can reduce fatigue performance because attached particles, valleys, support scars and near-surface imperfections act as local stress concentrators. The improvement obtained from finishing depends on how much material is removed and whether the controlling defect is actually eliminated.
A polished appearance does not prove that subsurface lack of fusion or porosity has been removed. Fatigue-critical routes should connect surface treatment with material allowables, residual stress, heat treatment, inspection and representative testing.
How to select a finishing process
Define function. Specify why the surface needs treatment: tolerance, sealing, fatigue, flow, wear, coating, cleaning or appearance.
Map accessibility. Separate open, recessed, internal and support-contact surfaces.
Set material-removal limits. Protect thin walls, sharp features, lattices and calibrated flow areas.
Choose the sequence. Heat treatment, HIP, support removal, machining, polishing, peening, coating and cleaning can interact.
Validate on representative geometry. Flat coupons rarely reproduce internal channels, downskin or support scars.
Measure more than Ra. Use the parameters and spatial scales that correlate with function.
Verify cleanliness and integrity. Finishing must not introduce contamination, cracks, embedded media or unacceptable dimensional loss.
Common mistakes
Specifying one roughness value for all surfaces regardless of function
Adding finishing only after the geometry and orientation are frozen
Assuming every internal passage can be polished uniformly
Using polishing to hide process instability rather than correcting the build route
Ignoring fixture, datum and tool-access requirements
Failing to account for removed material in tolerance and wall-thickness analysis
Evaluating visual appearance without checking fatigue, cleanliness or dimensional performance
Conclusion
Surface finishing is one of the main bottlenecks between a successful AM build and an accepted production part. No method is best for every surface. The correct route combines design, orientation, machining access, controlled material removal, cleaning and inspection around the actual functional requirement.
The landscape of 3D printing is in a perpetual state of evolution, and with each new advancement comes a wave of thrilling innovations. One such breakthrough that has captured the imagination of tech enthusiasts worldwide is the recent announcement that Nano Dimension has installed its state-of-the-art 3D printing system at NASA’s Marshall Space Flight Center. The system will be an integral component of a project aimed at 3D printing sodium-ion batteries, and Nano Dimension’s printer will play a pivotal role in ensuring the project’s success.
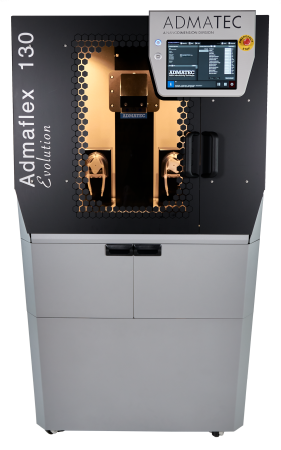
Nano Dimension is a leading purveyor of cutting-edge 3D printing technology, specializing in Additively Manufactured Electronics and multi-dimensional polymer, metal & ceramic Additive Manufacturing 3D printers. The Admaflex130, which is the printer in question, is an outstanding product that was acquired in July 2022 from Admatec Europe B.V. This remarkable device possesses the capacity to produce a wide variety of materials, including ceramics and metals, with an astonishing degree of precision. Its Digital Light Processing (DLP) technology makes it ideal for research and development projects and 24/7 digital serial production of functional parts requiring complex geometries, high resolution, fine details, and smooth surface finishes, while maintaining exceptional material properties.
What sets the Admaflex130 apart from the crowd is its unparalleled flexibility, allowing users to design bespoke materials and customize all printing parameters. This versatility is especially vital in research projects such as the one currently being undertaken at NASA. The efficacy of the project is contingent on the ability to print the sodium-ion batteries with exactitude, and the Admaflex130’s capacity for high-precision printing will undoubtedly prove invaluable.
Admaflex130 – Nano Dimension
The installation of Nano Dimension’s 3D printer at NASA’s Marshall Space Flight Center represents a significant milestone in the 3D printing industry. It speaks volumes about the printer’s reliability and quality, and NASA’s decision to trust it implicitly is a ringing endorsement of its capabilities. It also underscores the growing importance of 3D printing in research and development projects, particularly within the aerospace industry.
Yoav Stern, Chairman and Chief Executive Officer of Nano Dimension, expressed his delight at the installation, saying, “It is difficult to imagine collaborating with an organization that is pushing the envelope of space exploration as comprehensively as NASA. We are immensely proud that they have chosen the Admaflex130 from Nano Dimension. Our team took a risk in developing a printer that could print multiple materials while maintaining open parameter settings, and they achieved remarkable success. We are confident that this system will empower NASA’s pioneering leaders to manufacture innovative applications. And who knows? Perhaps one day soon, we will see one such application making its way to Mars.”
The installation of Nano Dimension’s 3D printing system at NASA’s Marshall Space Flight Center marks a turning point in the aerospace industry’s use of 3D printing technology. 3D printing has the potential to revolutionize the manufacturing process of various aerospace components, including engine parts, turbine blades, and even entire rocket engines. Moreover, 3D printing technology can help reduce the weight of these components, a crucial consideration for spaceflight, as every gram counts.
NASA has been using 3D printing technology to manufacture parts for its spacecraft since the 1990s, but with recent advancements, we are only now beginning to see the technology’s true potential. The installation of Nano Dimension’s 3D printing system at NASA’s Marshall Space Flight Center is just one example of how 3D printing technology is being used to push the boundaries of what is possible in space exploration. With this cutting-edge technology, NASA can now rapidly produce complex parts that would have been difficult or impossible to manufacture using traditional methods. This not only saves time and money, but also enables NASA to create custom parts on-demand, reducing the need for large inventories of spare parts. Furthermore, 3D printing technology allows NASA to experiment with new designs and materials, which could lead to lighter, stronger, and more efficient spacecraft in the future. As the technology continues to evolve, we can expect to see even more exciting applications of 3D printing in space exploration and beyond.